

If self-isolation has got you feeling bored, a fun project is only a few clicks away. Not only will these DIY projects keep you busy, but when you start to see the fruit of your labour, you’ll feel accomplished and also have something to look forward to!
Articles You May Also Be Interested In:
10 Puzzles To Keep You Busy In Self-Isolation
10 Of The Most Stylish Movies To Watch On Netflix
McDonald’s Canada Is Removing Menu Items Because Of COVID-19
12 Of The Most Cozy Sweatpants To Lounge In
13 Work From Home Essentials To Help With Productivity
With this worldwide pandemic in full effect right now, it’s not only toilet paper, cleaning supplies, and gloves that are sold out.
Medical-grade face masks are sold out everywhere, too. So much so that medical centres are asking for donations. Those who work in the medical centres are the individuals who work endlessly day in and out to ensure the safety of our friends and family across the world, so it’s best to leave the medical-grade masks for them.
Most recently, the Centers For Disease Control And Prevention (CDC) recommended face coverings to help slow the spread of COVID-19. So, let’s come together and show them how creative we can get making non-medical grade face masks.
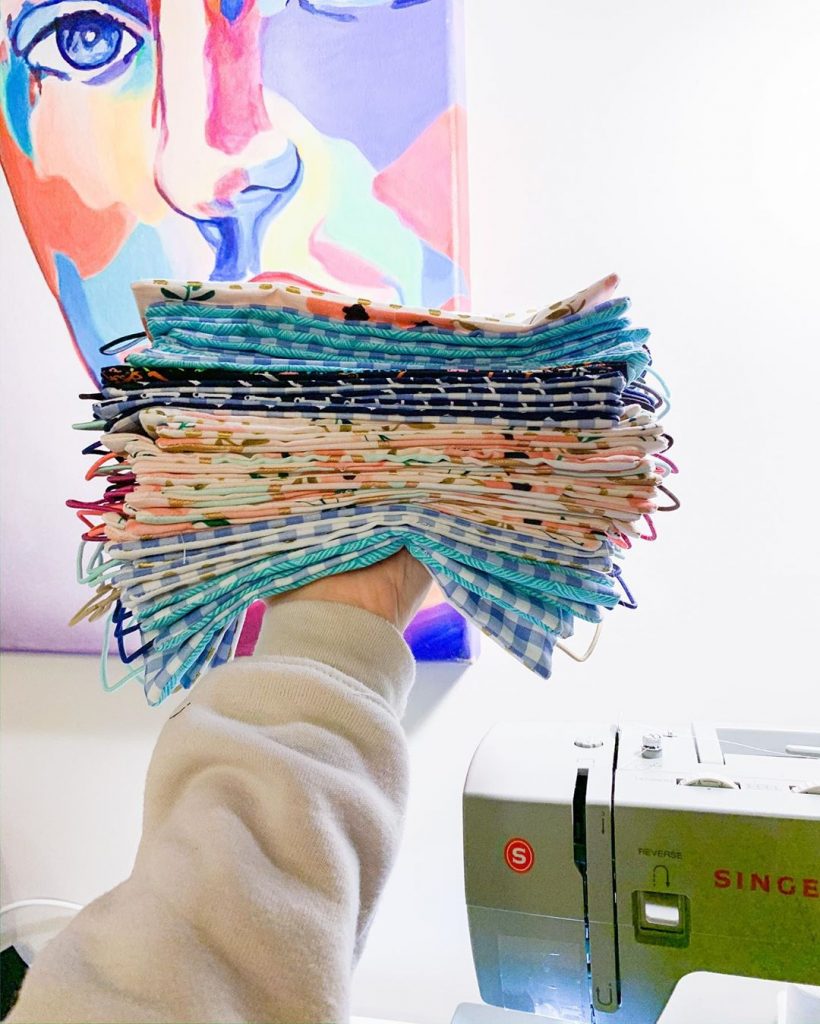
Whether you want to sew, hand stitch, or use items that are already in your household for a quick solution, the CDC has step-by-step instructions for you to follow to create the perfect face mask.
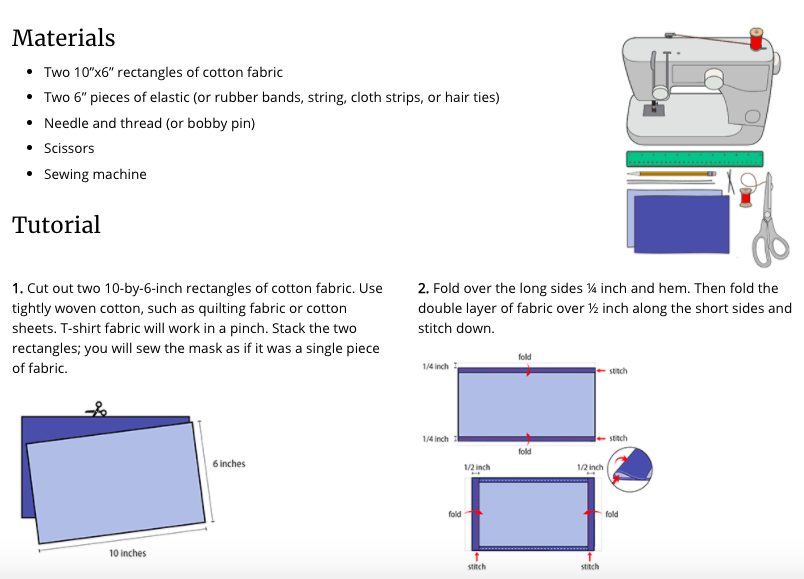
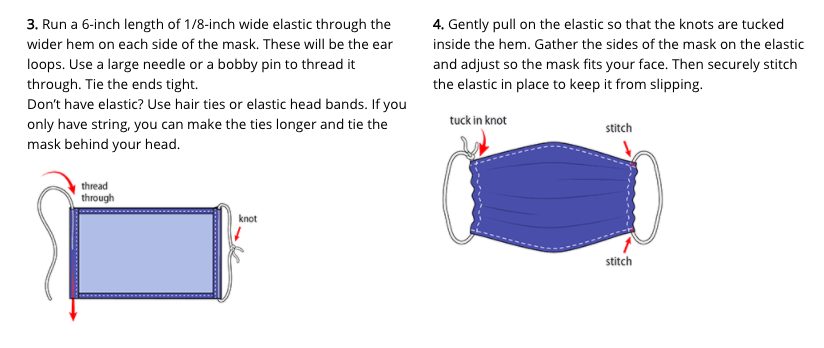
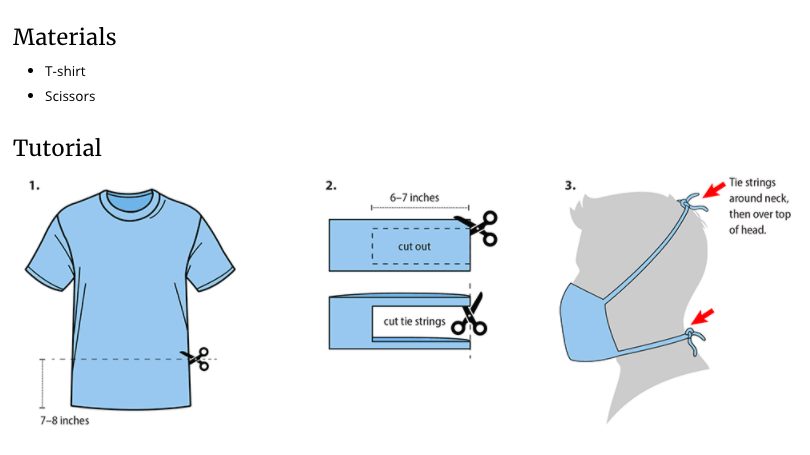
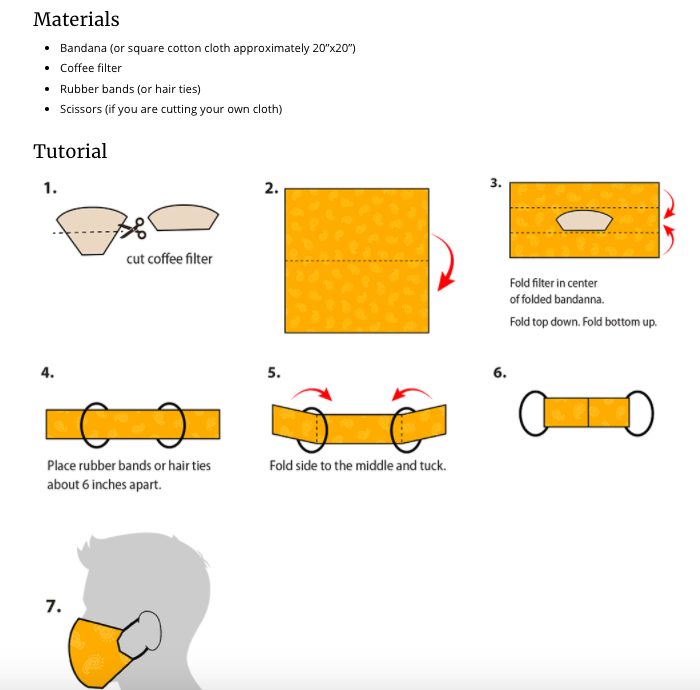
As we all know, face masks are limited anywhere you go. Sometimes we really just need a quick solution. The step-by-step above would also work with old items in your wardrobe and a coffee filter or vacuum bag as added protection.
In terms of choosing what type of cloth to upcycle, Dr. Scott Degal, chairman of anesthesiology at Wake Forest Baptist Health told New York Times, “Hold [the fabric] to a bright light. If light passes really easily through the fibres and you can almost see the fibres, it’s not a good fabric. If it’s a denser weave of thicker material and light doesn’t pass through it as much, that’s the material you want to use.”
Be resourceful and have fun with it — you can even make it a fashion statement!
Every medical staff member is working very hard for all of us across the world, so it’s best to leave the medical-grade masks for the people who need them most. While we should still be practicing social distancing and self-isolation, homemade masks are a good preventative measure to help slow the spread of coronavirus.
Now let’s get creative, stay home, and stay safe.
As a DIY queen, I love to learn how to make new things and I also love teaching people how to make new things, too. I host workshops teaching people how to make different plant-related items, but one day I aspire to be as amazing as some of these places that teach new skills. Doesn
Creating your own custom cosmetics may seem like a lofty (and expensive) dream, but a beauty lab in Toronto is making it happen.
Lip Lab by BITE is a somewhat recent addition to Toronto’s popular Queen West strip, but the Toronto-born lipstick brand has been making waves in the beauty scene for quite some time. A quick jump to Sephora, where the line is exclusively sold, shows an abundance of 5-star reviews. The reason? Founder Susanne Langmuir’s simple mission: create a quality lipstick that people love.
Made with the finest all-natural ingredients at a factory in Toronto, BITE is 100% food-grade, meaning they are literally good enough to eat. Each lipstick is creamy, long-lasting, highly pigmented and hydrating. While the brand boasts dozens of shades, their Lip Lab in Toronto (678 Queen St. W) allows beauty aficionados to take their love for cosmetics to the next level by offering personalized lipstick experiences.
At the Lip Lab by BITE, you’ll work with a Lip Lab Artist to customize everything from the finish to the shade to the scent. The entire process doesn’t take long (approximately 20 minutes) and is fairly friendly on the wallet (1 custom lipstick costs $55). We dropped by the Lip Lab to try the experience for ourselves.
Finding and funding rent for an apartment to yourself in the city is financially tough enough, so when it comes to furnishing, there’s usually not much budget left. Inherited old furniture is the way to go, and typically mom and dad are more than willing to help out. Problem is, most things they’ll offer up will be from the 70’s and, although in decent condition, aren’t exactly a perfect match to your new condo. Good news is, there’s ways to fix up the furniture so you don’t have to spend a bunch of cash on a trip to IKEA. Whether it’s a mirror or dresser, we got you covered with tips on how to refurbish your parent’s old furniture.
First you sand it, then you prime it, and finally, you paint it whatever colour your heart desires.
Image: Pinterest
Worn out wood from the 70’s is a look none of us are going for. Luckily, stain is cheap and easy, although it takes a day to do properly. Make your worn out light wood dresser modern with a couple coats of dark strain and, voila, it matches your new place.
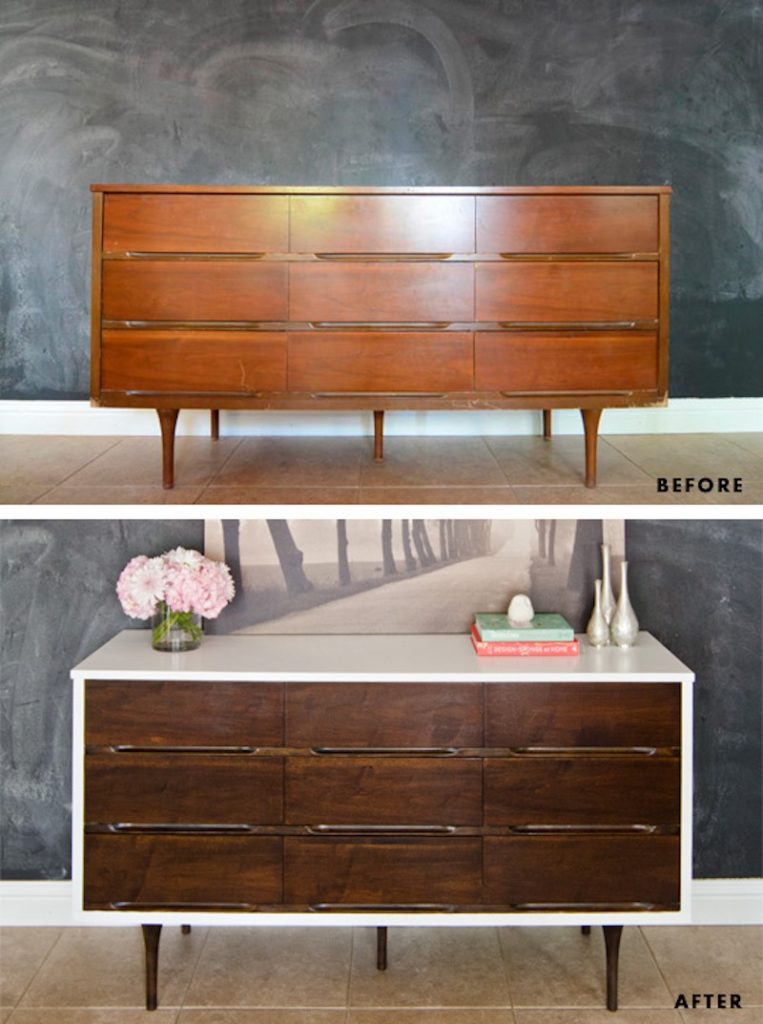
Image: Pinterest
Colourful antique is trendy, and it’s also really easy. All you’ll need is some spray paint and sandpaper. First, spray it. Once it’s dry, sand off some of the paint in small patches to get the vintage look and feel. You’ll have new, old furniture in no time.
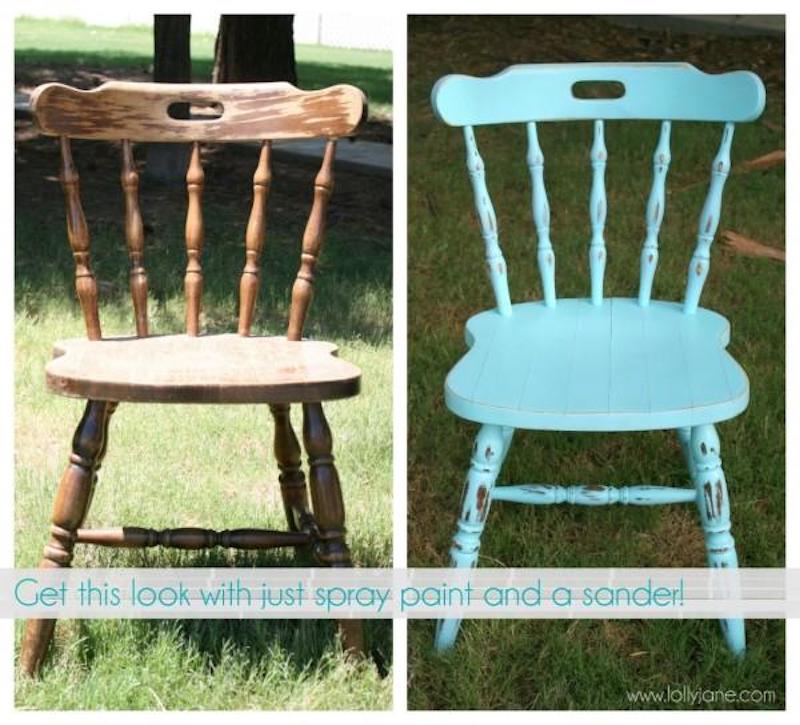
Image: Pinterest
Changing the handles on a piece of furniture is the equivalent to a face lift. Good news is, they’re easy to change and cheap to purchase. Have fun with it! Mix and match and make it your own.
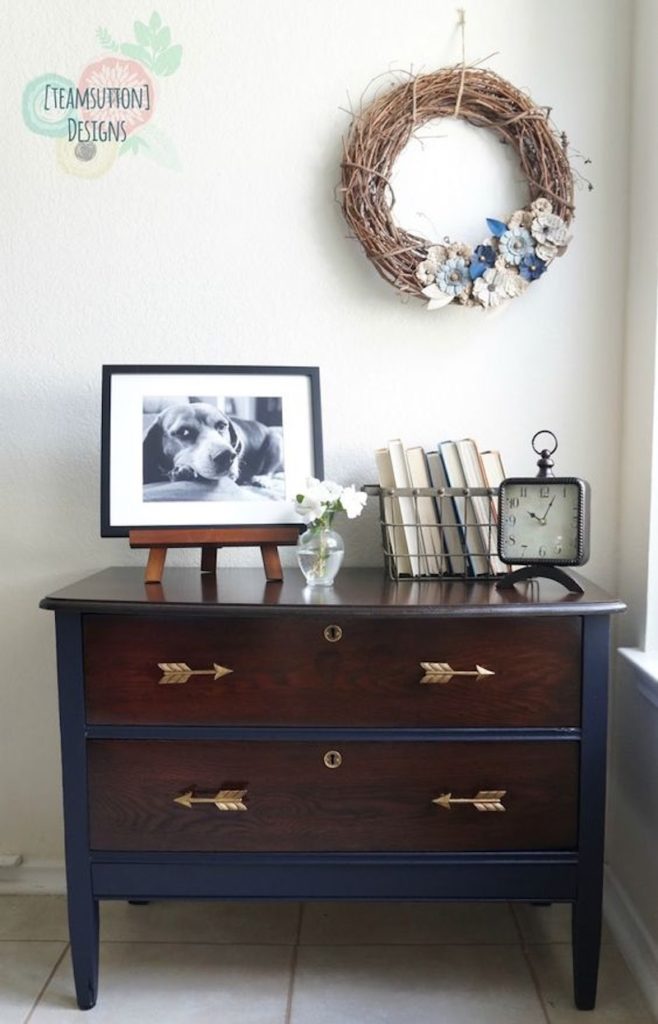
Image: Pinterest
Of course, old furniture tends to come with a couple deep scratches and dents from the wear and tear. It’s easy to fix any chips with Kwikwood, a putty that repairs and rebuilds wood. You can paint or sand over and you won’t even know it was ever there.
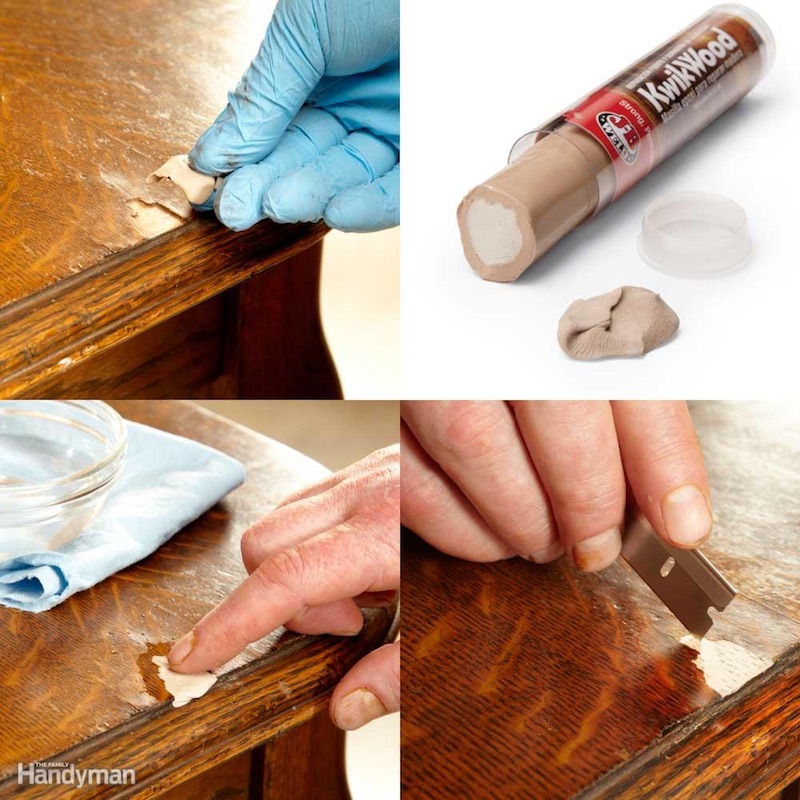
Image: Pinterest
Because you can never have too much gold around, and it makes a perfect accent.
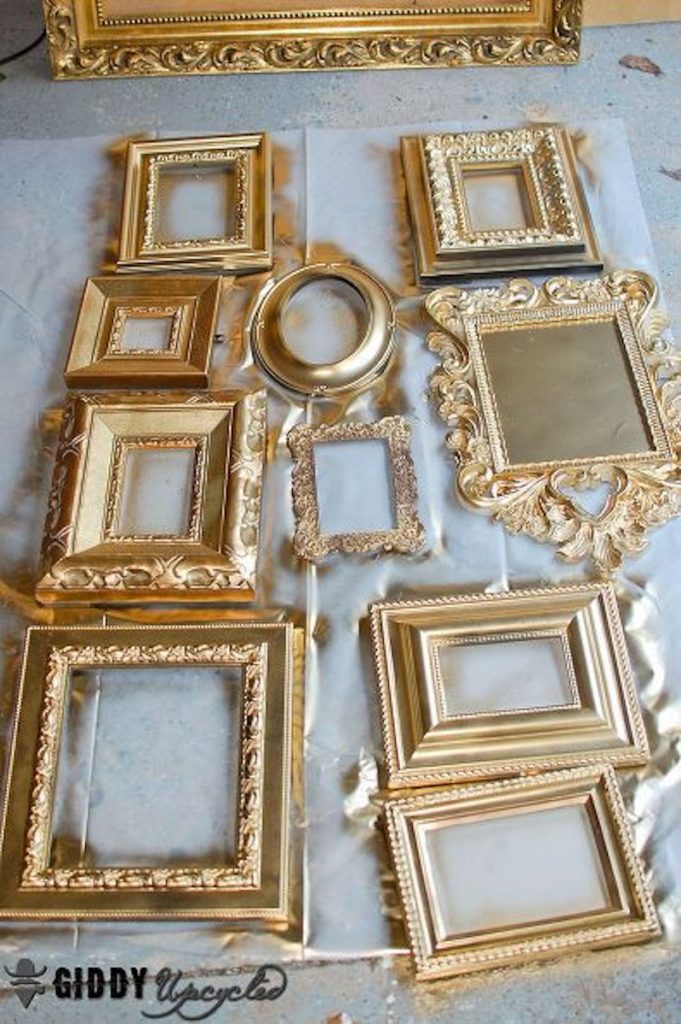
Image: Pinterest
The best part of old furniture is you can have fun with it. Adding design is easy. You’ll can use a stencil, old lace, or some tape will do, and spray paint over it to add an extra layer of dimension and personalization.
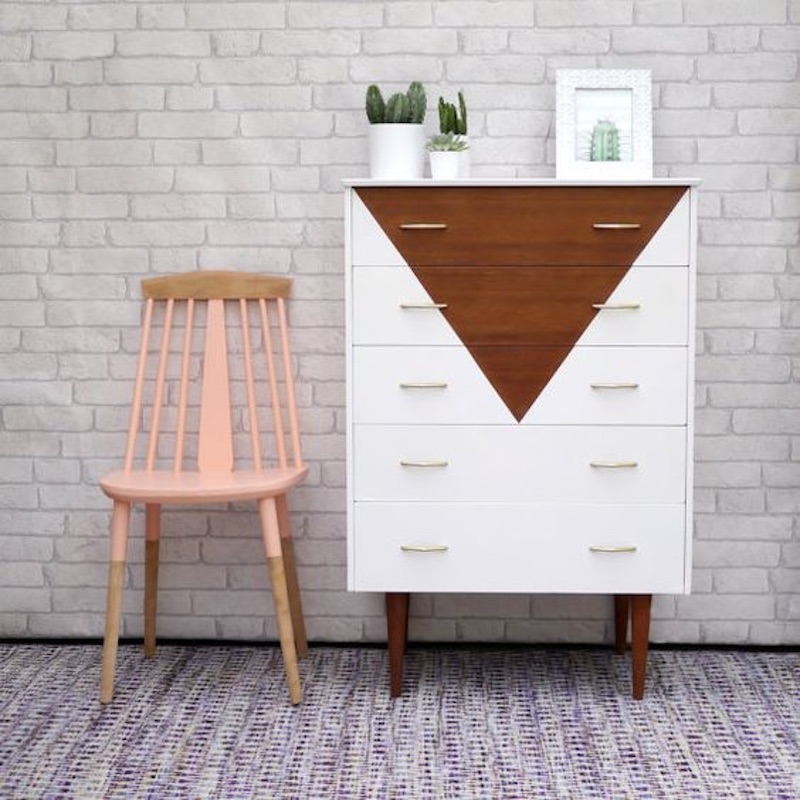
Image: Pinterest
Featured Image: Pixabay
Posts you might be Interested in:
Elte Has Opened an Outlet Store in Toronto
The Best HomeSense Locations in the GTA
Best Places to Shop for Cheap Home Furnishings in Toronto
6 Places to Shop for Home Decor on a Budget
Amazon is Taking on Etsy with New Handmade Department
Why spend a ton of money on that pricey “it accessory” of the season when you can just whip out your glue gun and DIY? Continue reading for a list of stylish fashion DIYs that you can totally pull off this summer!
https://www.instagram.com/p/BXSrSgXB7yN/?taken-by=cheerscharlie
Thanks to high-end designers like Miu Miu, pearl-embellished slides is a trend that doesn’t appear to be going away any time soon. The slides above are a dupe for the (now sold out) Zara ones, and look super easy (and fun!) to make. Happy sewing! (via Deconstrut)
https://www.instagram.com/p/BGxg0BJLsMx/?taken-by=kim_madeinaday
Embellished basket totes are all the rage right now…but have you ever considered decorating your own versus buying a pricey one in-store? All you need is to find a bare basket (which you can get for cheap at the thrift store), and then embellish it with some colourful trim, tassels and fun pom-poms. (via Made in a Day)
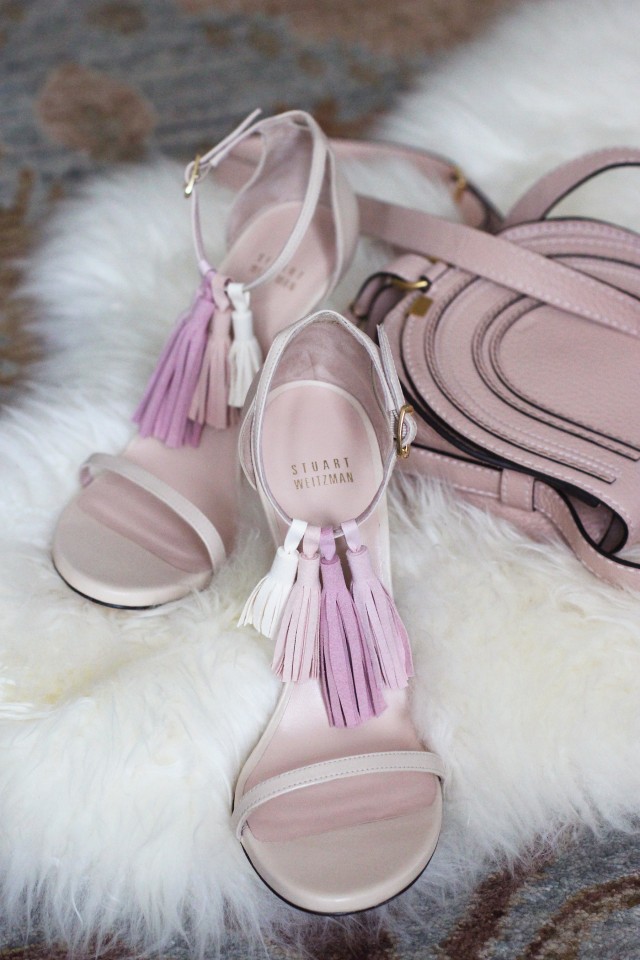
Image: HonestlyWTF.com
These tassel sandals may look super expensive (okay, maybe they are considering the DIY-er here used Stuart Weitzman’s), however, you can definitely achieve the same look for less. All you need is a pair of plain ankle-strap sandals and to create some colourful tassels…and voila! (via Honestly WTF)
https://www.instagram.com/p/BJ0VdEUgpJ3/?utm_source=ig_embed
One of the biggest denim trends to pop up as of late is frayed, fringed-hem jeans. And while the look may seem intimidating to DIY, it’s actually a lot easier than you think. Time to grab your scissors and start snipping! (via Huffington Post)
https://www.instagram.com/p/6N09aAknu_/?taken-by=lovemaegan
Another denim trend we can’t get enough of? Pearl-embellished jeans. There’s just something about the juxtaposition of fancy pearls and rugged denim that makes for a drool-worthy combo. The DIY-ed jeans here are a virtual dupe for the super-pricey version from Paige Denim! (via Love Maegan)

Image: TheStripe.com
For some reason, tassel earrings always end up being expensive af when bought in-store (we’re talking to you Anthropologie!) Luckily, this clever DIY-er has provided a handy step-by-step tutorial on how to get the same look for less. (via The Stripe)
https://www.instagram.com/p/BGcJEpoJwhF/?taken-by=thesoutherngloss
Unfortunately, the almost $500 Eugenia Kim, celeb-approved sun hats are not in our budget right now. But a wallet-friendly DIY that looks pretty much identical to the real deal? Count us in! (via The Southern Gloss)
Featured Image: TheSouthernGloss.com
Posts you might be interested in:
Levi’s® Canadian Flagship Is Exclusively Offering Vintage Clothing
This Canadian Duo Creates Custom Furniture That’s Affordable
8 Places in Toronto Where You Can Create Custom Clothes
Meet miix Footwear; Sneakers With Over Seven Million Custom Possibilities
The 10 Biggest Canadian Store Openings of 2018
The weather over the weekend was fabulous and had me inspired to deconstruct this cute little DIY Spring terrarium I made late last week at an event with Crown Flora. I’m a huge fan of air plants, they are super low maintenance and such a perfect way to add life to the home without too much work. Much of the decorative materials I used can be purchased from a craft shop (heck, check the dollar store, lots of goodies there!), with the exception of the terrarium glass dome and air plant. You’ll likely have to visit a floral/garden supplies shop for these specialty items. But free to plant your air plant terrarium using other types of vases, there are so many options out there!


Step by Step: Secure the air plant in it’s place first inside the vase. Spoon assorted stones and rocks as a support anchor to the air plant. / Arrange a variety of moss around the base / Place remaining decorative items / Be creative and have fun! / To hang the vase, simply loop a ribbon, rope, or twine through the top hole and affix to the ceiling of your home with a nail or screw.

Air plants prefer cooler temperatures and an atmosphere that is not too dry, they can survive typically from water mist. However, you will need to submerge the plan in water for two to three hours about every 2 weeks.
Want to see more posts like this? Get your fix of news, shopping tips, sales and event information on Facebook, Instagram and Twitter. Sign up to be a StyleDemocracy Insider here.
The DIY movement has hit the sneaker world in a big way, and Nike is once again the leader in this new sub-category of sneakers. Nike will be releasing a special Air Force 1 Low that will give wearers the ability to change the colour of the swoosh on their kicks. The interchangeable branding is available in yellow, red, purple, blue and green, and is available on either a black or white Air Force 1 Low.
People are looking for ways to make their outfits their own, and Nike’s effort to continually give the people what they want will surely be a successful model for them.
Currently, there is no official date for the launch, but we will update you when we get the information.
With the maddening craze of planning Christmas parties, dinners, outfits and gifts, it’s almost easy to forget about New Year’s eve. We know how expensive the holiday season always is, but don’t let that stop you from starting out the new year with a bang or a bash! We’ve gathered some expert hosting tips on how to plan a New Year’s Bash on a Budget and because it’s the season of giving…we’ve decided to share it with you.
Ditch the fancy dinner entrees and have your guests bring their own appetizers (BYOA!) Not only will you save on the cost of food, but also save on time since you won’t have to prepare everything yourself. If you’re stumped for recipes, we’ve rounded up some of our favourite holiday dishes for you here.
Champagne can be costly, especially if you plan on having a large gathering, so instead of drinking it straight –make it into sangria and replace the traditional wine in the mix with Champagne instead, that way people will still get their fix. We love this simple serving station and recipe by Something Turquoise.
Dedicate a small section of your home (or even just a wall) for picture taking purposes. You can go to the dollar store and find props to make it even more entertaining or use our simple tips and make your own photo booth!
Black, White, Gold and Silver tend to be the popular colour choices for NYE parties so stick to a specific colour scheme and use whatever décor you already have. If you still have the glittering gold candles from Christmas dinner or the sparkling silver center pieces from previous birthday parties – bring them out!
Posts you might be interested in:
The Best Winter Patios in Toronto
The Chicest Toronto Airbnbs for Your Winter Staycation
Blue Mountain Will Transform Into A Magical Winter Wonderland This Holiday Season
5 Affordable Vacations to Consider for your Winter Escape
WOW air is Offering $150 One-Way Tickets to Multiple European Cities for Canada’s Birthday
If you’re looking to get crafty and try a DIY trend this fall, this one is seriously easy and doesn’t look cheap. You may have noticed a number of brands like Free People, Zara and Joe’s Jeans (to name a few) embellishing rugged denim with pearls. I loved this look and immediately seized the opportunity to make it myself at a much more affordable price.
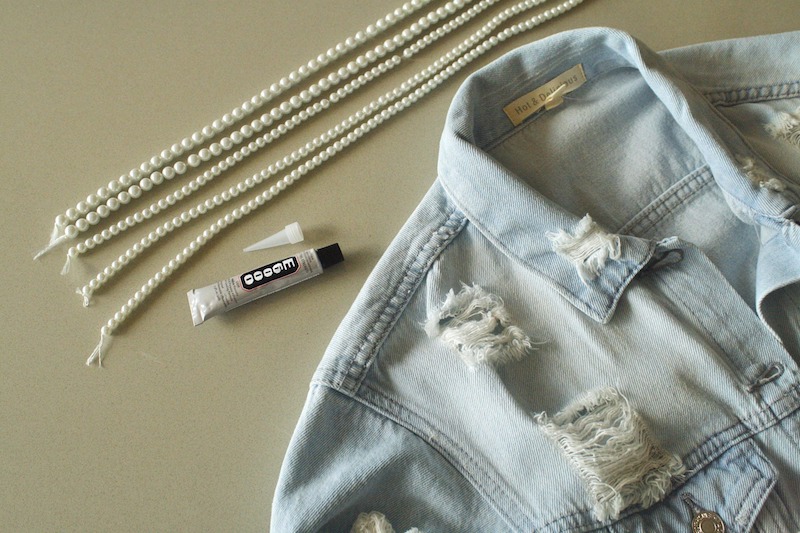
What You Need:
I chose to DIY this killer denim jacket from M Boutique on Queen West, but you can also pick up a jacket or jeans from Forever 21, H&M or Value Village, etc. All your other supplies (pearls, nozzle and glue) can be found at any craft or bead supply store.
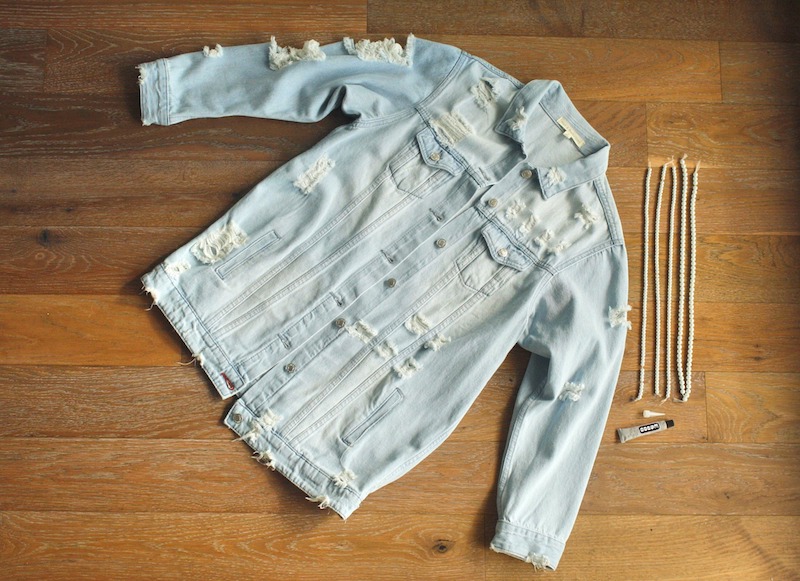
Once you’re ready to get started, lay the jacket or jeans out flat and arrange the pearls to get the pattern you desire. I decided to do two different sized pearls to make the look more interesting.
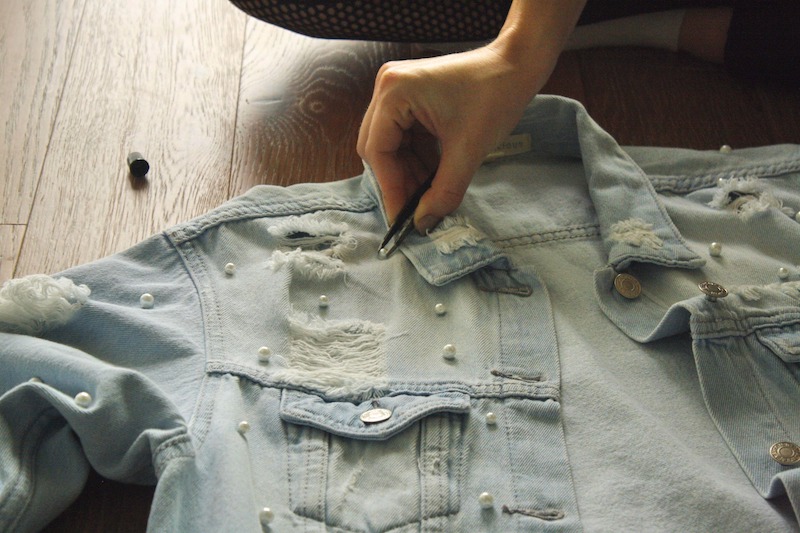
After all the pearls are in position pick them up one at time with a pair of tweezers, squeeze out a glob of fabric glue with the nozzle for more precision, and then stick the pearl on. It’s really that simple.
Once you’ve finished a side let it dry for about a day before flipping it over to do the back. Finally, reinforce any pearls that seem loose with more glue and voila — you’re done!
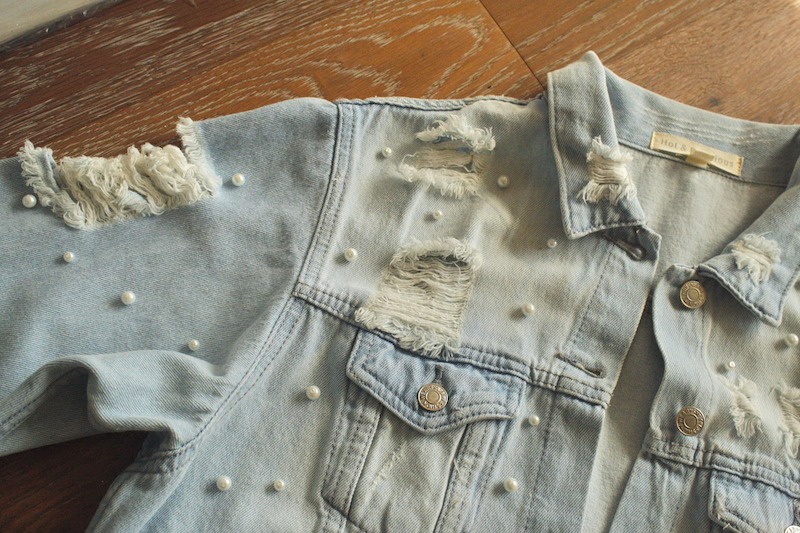
You may be wondering how well the pearls actually stay on? I know I was, so I did a few tests myself (literally dropping the jacket on the floor and shaking it out). I was surprised by how well the glue held as no pearls fell off. Although, I would recommend spot cleaning instead of machine washing or sewing the pearls on if you plan to wear your jacket or jeans a ton.
Take a peek at the final look below:
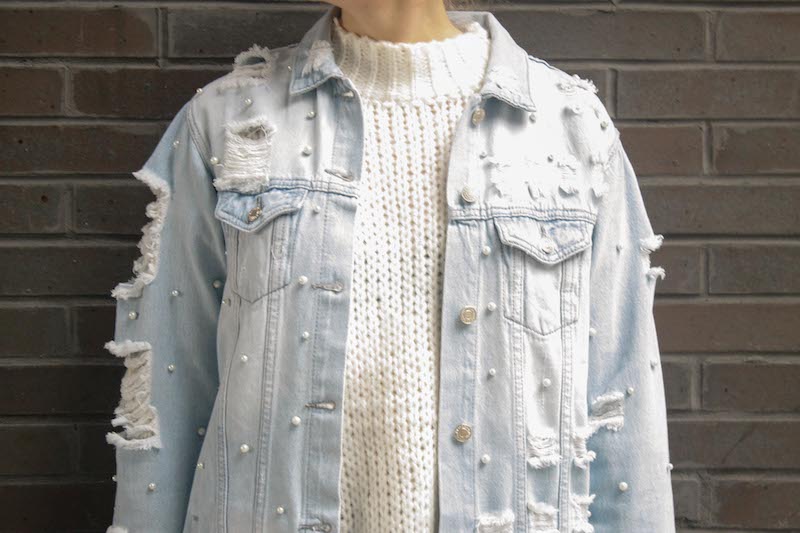
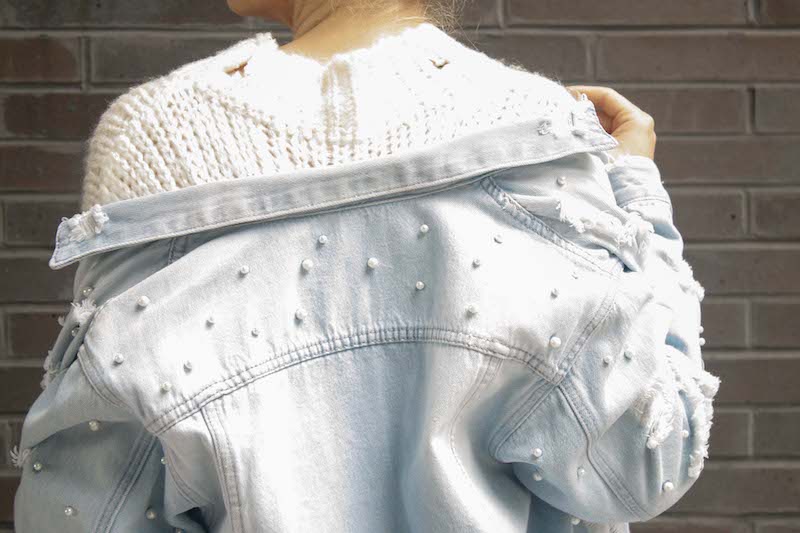
All images via Aly Zorn
Posts you might be Interested in:
Our Favourite Bench Bomber Jacket — DIY Patch Edition
10 Life Changing IKEA Hacks for the DIY-Enthusiast
7 Simple DIY Costumes for Halloween
10 Most Anticipated Sneaker Relases for Fall & Winter 2017
7 Canadian Brands that Celebrities Love


